Photographing Dwejra’s Night Sky

joseph/ August 3, 2019/ Uncategorised/ 0 comments

Photographing Dwejra's Night Sky

This is a special feature focussing on Dwejra’s night sky.  It accompanies the short video clip I’ve produced that showcases some of the celestial marvels imaged from Dwejra. If you have not watched the video yet, then I suggest that you do that first.  The video is found just below.  Following that, you may proceed with reading the rest of the article to learn more about what the various images show and how they were captured.

What do these images show?

These images show a variety of objects.  In this section we shall take a look at each in the order that they appear in the video.

The Milky Way: Our home in space

First, we start off with our home galaxy – The Milky Way.  A galaxy is a group of billions of stars (i.e. billions of suns – don’t forget that each star is a sun) held together by the force of gravity. The universe contains billions of galaxies, each containing billions of stars.  The Milky Way is just one such galaxy, but is special to us because we reside in it, so it is our home in space.  Galaxies come in various shapes and sizes.  Some of them are spirals.  The Milky Way galaxy is such a spiral galaxy, but we cannot appreciate its true shape from Earth.  The reason is simple to understand.  If you wanted to take a picture of your house, you would first need to get out of the house and walk to a distance from which you can get a view of the entire building. If you are located inside the house, you cannot do that. Rather you restricted to a view of your house from within. The same goes for our galaxy.  In order to appreciate its shape and entire structure, we would have to hop on a really fast spaceship (none of these exist) and exit the galaxy altogether. As it stands, we are bound to Earth, so the view we get of our home galaxy is an interior view, so to speak.  When we look at the sky and look toward the core of the Milky Way – we get the view shown in this picture, namely a band of light made up of clouds of gas, dust, and billions of stars.

The Milky Way spans around 100, 000 light years across. In other words, it has a diameter of around 100, 000 light years (or a radius of 50,000 light years).  We are located around 25,000 light years away from the centre, so we are quite far out.  Let’s put things in perspective, shall we? Imagine you had a spacecraft capable of cruising at the speed of light. At that velocity you’d be able to make 7 trips around the Earth in just one second!  And yet, the galaxy is so big that with such a spacecraft it would still take you 25, 000 years to travel from Earth to the galaxy’s centre. If you wanted to do the trip from one side of the galaxy to the other, you’d need 100, 000 years!


Close-up view of the Milky Way

The next image in the sequence also shows the Milky Way, but we have zoomed in a bit.  The darker parts of the image are dust lanes in the galaxy that obscure the light of stars that lie beyond. Enclosed in a box are two objects that we shall return to shortly – the Lagoon and Trifid nebulae.  More on them later.

Annotated Milky Way imaged from Dwejra

Partial Lunar Eclipse

We next have a picture of the partial lunar eclipse that happened last month.  This means that the moon is partially in Earth’s shadow.  (That’s the reddish part of the moon’s face in the photo.)

Partial Lunar Eclipse from Dwejra

Stellar Nurseries

Remember those two objects I told you we would return to – The Lagoon & Trifid nebulae?  We are now zooming closer on them.  The Lagoon nebula is the large pink cloud and the Trifid is the one to its lower right. These are two clouds of gas from which stars are born.  In astronomical nomenclature, they are known as emission nebulae and HII regions. The latter means a site where recent star formation has partially ionized the gas.

The Lagoon and Trifid Nebulae from Dwejra

Panning across the Milky Way

This is a wide-field shot of the Milky Way, showing its splendid dust lanes and colours. Notice how the core is more yellow in colour due to older stars residing there. Old and cooler stars emit warmer light than hot, young stars, which glow blue or white.  This is akin to what you may observe upon heating an iron bar. It first glows red/orange. As it gets hotter it burns brighter, shifting into yellow.  Eventually, it glows blue-white, hence the expression “white hot”. The same occurs with stars.

A wide-field view of the Milky Way from Dwejra

Nebulae and star clusters

This image, which is another close-up shot of the Milky Way, shows other nebulae as well as a number of star clusters. Of particular note are the well-known Eagle and Omega nebulae.  The subsequent shot in the video (which I skip here) shows the same image, but focusses on the central region of the frame.

Various Nebulae from Dwejra

A Dying Supergiant and an Old Star Cluster

Now it’s a splash of colours. This image zooms in on the red supergiant star Antares – the bright yellow object at the centre of the frame. If you go back two images to take another look at the wide-field shot of the Milky Way, you can actually see this yellow star (and the nebulosity that surrounds it) close to the right edge of the photograph.  I am marking reproducing the same image to the right, with Antares marked.

Antares lies around 550 light years away, and it’s a huge star. Just for some perspective: this star is so large that if it occupied our sun’s location in space, it would engulf both Earth and Mars. Speaking of which, the very name ‘Antares’ means ‘Rival to Ares’, or, in other words, ‘Rival to Mars’, a moniker it earned due to its similarly red colour as it appears in the sky. The yellow cloud around it is gas that Antares itself has thrown out. This gas is being made to glow by the radiation spewed out by the nearby blue star.  To the bottom right of Antares, you can see tight cluster of stars.  This is a class of objects known as Globular clusters.  Globular clusters are very old systems of hundreds of thousands of stars that orbit the galaxy as a group.  This particular one is more than 12 billion years old.

Antares and the Milky Way at Dwejra
Antares imaged from Dwejra

Jupiter & The Milky Way

For this image we have taken a step (of cosmic proportions) back to return to a wider view of the core of the Milky Way.  The dazzling bright object to the right is planet Jupiter.  At the moment, Jupiter is located in this part of the sky. Being a planet, it does not always occupy the same location.  The very word planet derives from the Greek planētes asteres, which means “wandering stars”, a name owed to the dance they make across the heavens.

Jupiter and Milky Way from Dwejra

The Dumbbell Nebula

This image shows an object commonly known as the “Dumbbell Nebula” or just “The Dumbbell”.  The Dumbbell falls under a class of objects called planetary nebulae, although they have nothing to do with planets. What we are seeing here is a star late in its life. It has shed off its outer layers, resulting in an expanding cloud of glowing gas.

The Dumbbell Nebula from Dwejra

The Summer Triangle

This image shows a very wide view of the Milky Way, but it focusses on another part which is fainter and, consequently, imaged less often.  This is the part of the Milky Way enclosed by what is known as “The Summer Triangle” (since summer is the optimum time to observe it) marked by the three stars Vega, Deneb and Altair.  Just below Deneb is an object that will be the focus of our next image – “The North America Nebula”.

The Summer Triangle from Dwejra

The North America Nebula

This is another emission nebula.  Due to its striking shape, it is known as “The North America Nebula”.

The North America Nebula from Dwejra

The Winter Sky

This image shows the winter view of Dwejra’s night sky over the Fungus Rock.  Note the constellation of Orion to the right, and the brightest star of the Northern hemisphere – Sirius (the bright star close to the centre of the frame).

Orion and Sirius from Dwejra

Towards Rho Ophiuchi

This wide-field image was taken on a day with particularly good sky transparency, and shows a lot of structure in the Milky Way. The image is a preamble to the close-up view that follows next – an image of a region known as the Rho Ophiuchi Complex, which is enclosed in a rectangle in this image.

The Milky Way and Rho Ophiuchi from Dwejra

Rho Ophiuchi

We have now zoomed in on the region enclosed by the rectangle in the above image, and have arrived at the Rho Ophiuchi Complex.  This dark nebula is one of the closest star forming regions to us.  The binary star system of Rho Ophiuchi is located in the blue cloud toward the top right of the image.  The bright yellow star is the supergiant Antares, which we encountered earlier.  Note also the dark dust lanes.

Rho Ophiuchi complex from Dwejra

One last peek at our home galaxy

This image gives us one last glimpse of a part of the Milky Way, before we head off much further into space…

Core of the Milky Way from Dwejra

The Andromeda Galaxy

We have now left our galaxy altogether and are zooming in on the farthest object you can still see with your naked eye – The Andromeda Galaxy – a system that lies just over 2.5 million light years away.  It is a very large galaxy, with a diameter of 220,000 light years, which makes it around twice as large as the Milky Way (~100,000 light years).  The combination of it being so big and (relatively speaking) so close means that it appears quite large in the sky, and can be well-captured without the use of a telescope.

The Andromeda Galaxy imaged from Dwejra

Interacting Galaxies: The Whirlpool and its Companion

We are now peering deeper into the cosmos, looking at a system of two interacting galaxies located around 23 million light years away.  The larger of the two is known as “The Whirlpool”, owing to its grand spiral shape.  Close by there is a companion – a dwarf galaxy that is interacting with the Whirlpool.  The Whirlpool galaxy has a diameter of around 76,000 light years, so it’s a bit smaller than our Milky Way (~100,000 light years).  It being so far away, it looks very small in the sky.

The Whirlpool Galaxy from Dwejra

Another pair of Interacting Galaxies

The galaxy at the centre is M81, also known as ‘Bode’s Galaxy’, and the one to its upper right is M82, or ‘The Cigar’. M81 is half the size of our own Galaxy and lies 12 million light years away. It hosts a supermassive blackhole at its core. It gravitationally influences the nearby M82, due to which interaction, the latter became a starburst galaxy, meaning a galaxy exhibiting intense star formation. M82 appears elongated since we are viewing it edge-on.

There are actually three more galaxies visible in the image. One of them, NGC 3077, is easy to spot to the left of M81. (It appears as a small, extended, faint blob of light.) The other two, NGC 2959 and NGC 2961 are visible to the lower right of M81 (but look like stars in this image).

Galaxies imaged from Dwejra

Back to our starting point, but during a lunar eclipse

This image takes us back to where we started – a landscape / skyscape view.  It starts off with the focus being on the eclipsed moon, and zooms out to show the Milky Way – faintly visible despite the moonlight. Had it been a full moon, it would have been next to impossible to record the Milky Way, but since an eclipse was underway, its faint glow was detectable.

Lunar eclipse at Dwejra

The Bane of Light Pollution

The next two images show the exact same patch of sky, the only difference being that the first one was captured in Dwejra and the second one in another village in Gozo.  Equipment setup and settings were exactly the same (i.e. same camera, lens, sensitivity, aperture setting, exposure time etc.)  It clearly shows how light pollution is disconnecting us from the beauty of the night sky, rendering us blind to the majestic sights that for millennia inspired human beings.

Spread the word!

This image was taken a few years back during an evening of astrophotography.  Its message, I hope, is clear. The night sky is a treasure. It is part of our heritage and belongs to all of us. None should be allowed to blind us to these humbling sights for their own personal gains. Dwejra and its beautiful environment should be protected for future generations to enjoy.  It is our responsibility.  We shall be judged by those who follow us, and rightly so.

You can read more on light pollution by clicking here.  You may also learn more on the website of The International Dark Sky Association.

People and the Milky Way at Dwejra

How were these images produced?

All images were captured with the same camera, a Digital SLR, with a lens mounted to it. The lens used varied depending on whether I wanted a very wide field-of-view or whether I wanted to zoom in for a bit of a closer view of a specific object.  No telescope was used, but for some of the images, I used a ‘star tracker’.  I will soon explain what a star tracker is and why it is required.

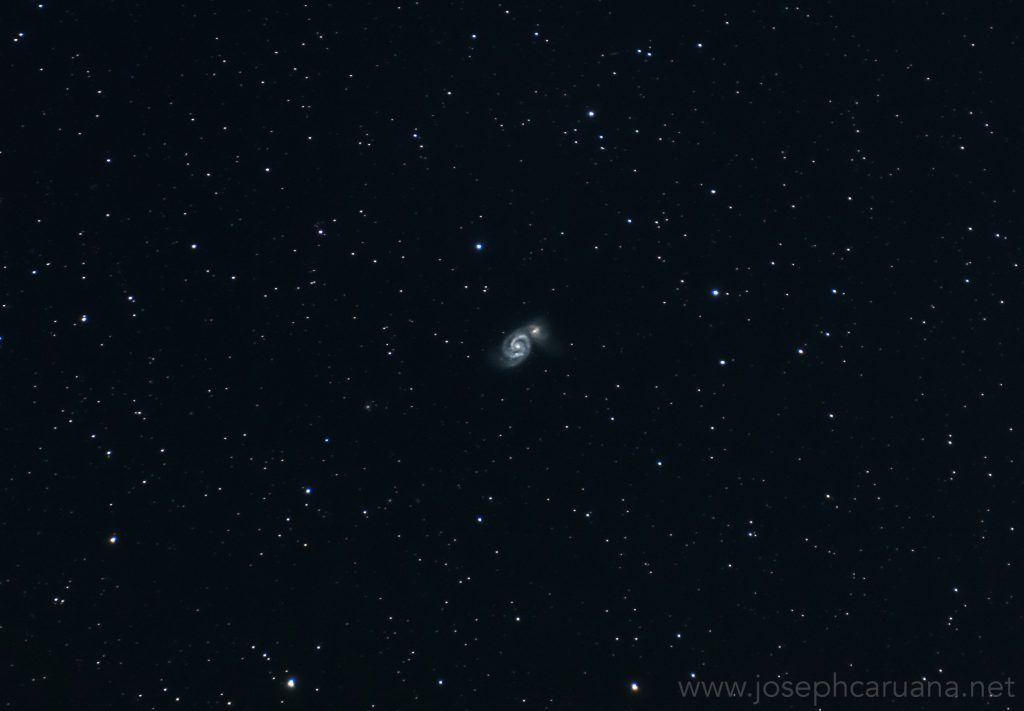
Some of the objects in these images are so faint that a “normal photograph” – a quick snapshot if you like, would not manage to record them on the camera’s sensor.  These faints objects require a long exposure, meaning that the camera shutter is left open for some time, say 30 seconds or longer, to gradually collect light bit by bit as it falls on the camera’s sensor, after having crossed vast distances across space.

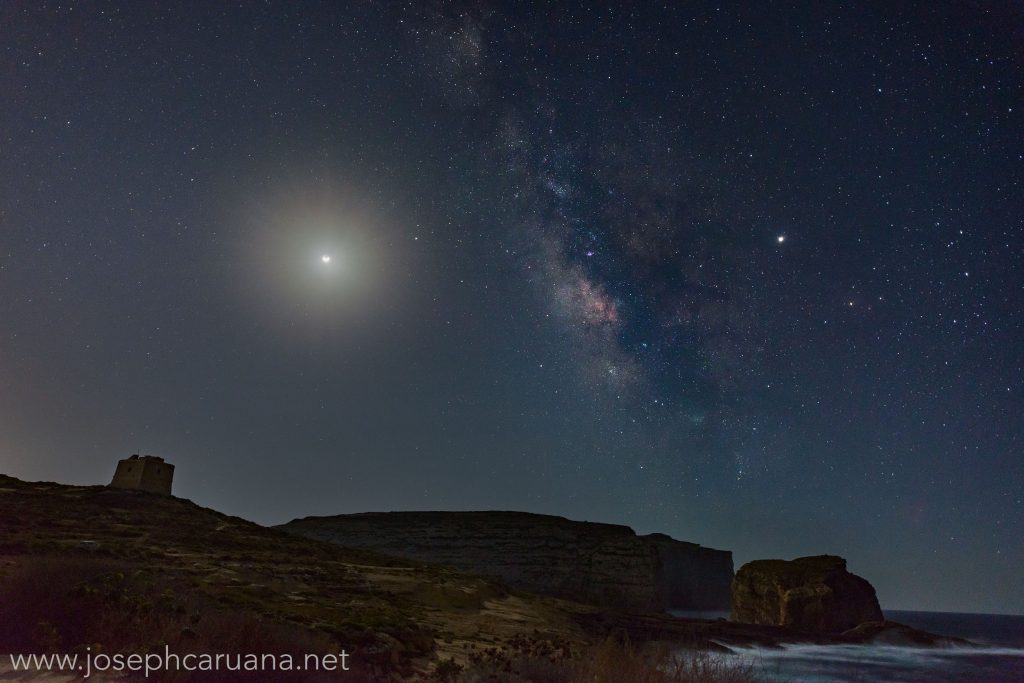
Now, over the course of the night (and day), the Earth rotates.  As it does so, the stars appear to move in the sky, just as the sun appears to move during the day, rising in the East and setting in the West.  A star tracker slowly rotates in the opposite direction to the Earth’s spin, in so doing counteracting the apparent movement of the stars, and thus keeping the camera fixed on them throughout a given exposure. If we left the camera’s shutter open for, say, a whole minute without using a star tracker, the stars would appear as trails of light, not the pin-sharp dots that we want.

Oftentimes, a single 30-second exposure is not sufficient to collect enough light.  In such instances, we may either increase the exposure time, i.e. leave the shutter open for, say, a minute or more (depending on how faint the object is), or use another method which I describe next.

Let us say you were trying to take photograph of a very faint object, such that you require a very long exposure of 20 minutes for it to appear bright enough.  Rather than taking a single 20-minute image, you can break up the photograph into a series of shorter exposures, e.g. 4 images of 5-minute exposure time each (for a total of 20 minutes).  Equivalently, you may choose to take 10 images of 2 minutes each (which still make up a total of 20 minutes), or even 40 images of 30 seconds each.  Then, after you have captured your images, you stack them one on top of each other on your computer and take an average.  There are different ways to achieve this, but the end result is that you combine the signal recorded in each of your separate frames into a final image that is made of the sum total of your images.

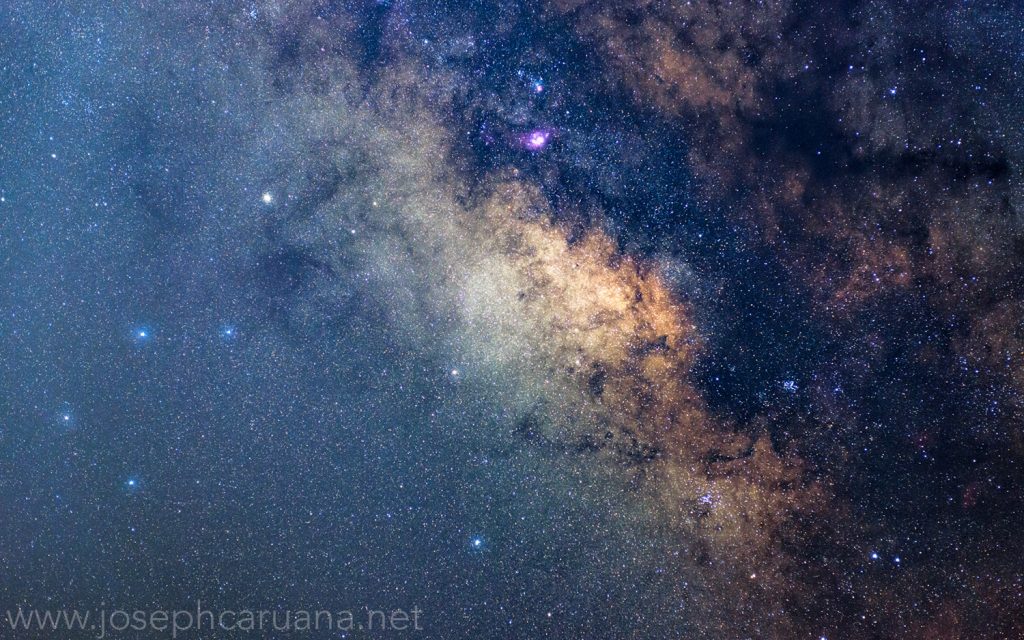
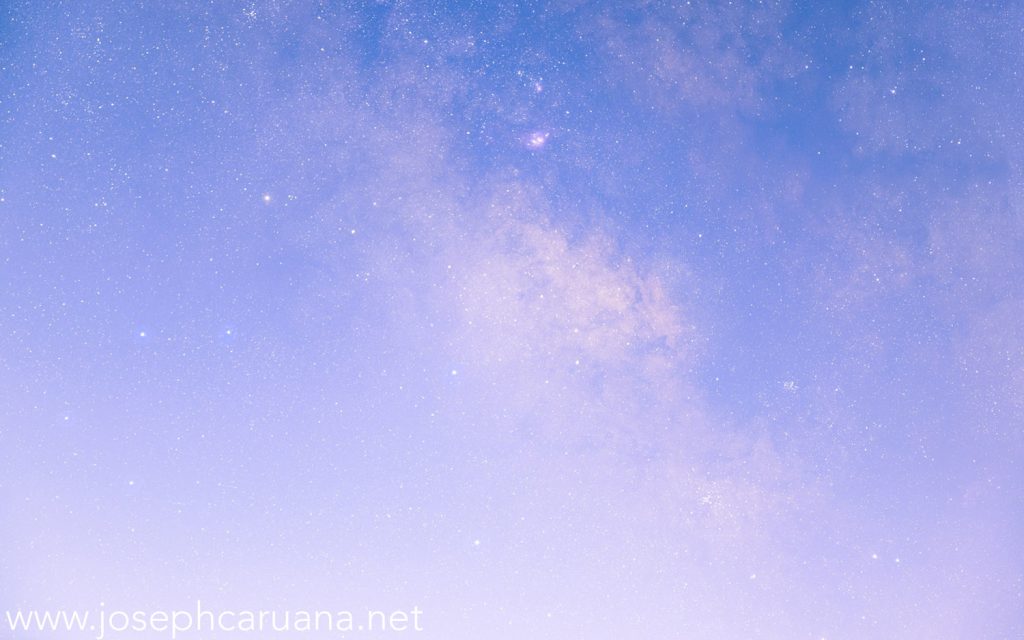
Many of the images in this feature were produced by taking a number of such exposures, then adding them up in this manner until the objects become sufficiently bright.  As you may imagine, if you were to carry out the same procedure from a light polluted site, each individual frame would also be recording artificial light (i.e. light pollution), so when you add up all the images, you would not be increasing just the signal from the object, but also that from artificial light.  In other words, this method does not help your situation if the sky is light-polluted.

What does the Milky Way look like to the naked eye?

Just as with photographs, this depends on the location from which you observe it. The less light pollution, the clearer and more pronounced it is.  Of course, since human vision does not detect colour well in low light conditions, the colours of the Milky Way do not show up when you observe it by eye.  However, the band of snowy white light criss-crossed by dark dust lanes and peppered with thousands of stars is a stunning sight in its own right, and it can be enjoyed without the need for any visual aid.

The below image is a photograph that has been edited to simulate what the Milky Way would like to your naked eye.  Needless to say, this simulated view is far from perfect.  Also, the exact view will vary from day to day depending on the sky clarity (or, as we call it in astronomy, transparency), as well as visual acuity of the observer.  It is important that once you are on site, you avoid looking at any bright lights (including your mobile phone!) to allow your vision to dark-adapt.  In fact you might notice dark adaptation at play even with the below image. If you look at it straight after looking at a bright screen (e.g. a white region of this page) it will look darker than it does after a while staring solely at the image (while perhaps covering up the surrounding white zones on your screen).

It takes between 20 and 30 minutes for your eye to properly adapt to darkness, so once you head out to observe the Milky Way, make sure you take your time.  Put that phone away, and look only up!

Can I take a picture of the Milky Way with my camera?

Digital camera technology has advanced tremendously in the past years.  Small, consumer cameras have sensitive sensors that allow them to detect fainter light than ever before. Any camera that allows you to take a long exposure (and that is most cameras) will be able to (at the very least) register the faint appearance of the Milky Way.  Nowadays, even some phones have sufficiently good sensors to capture the Milky Way.  

Key points to keep in mind are to:
(1) find a dark site such as Dwejra,
(2) put your camera on a steady platform (e.g. a tripod or, if not available, a rock will do), and
(3) gently push the shutter button to avoid camera shake.  

If your camera allows you to manually select the sensitivity, make sure you do so.  This setting is called “ISO”, and you’ll want to go for the highest setting that yields decent quality. Most probably, the very highest setting available will yield images that are too grainy/noisy. If so, just go down one step at a time, until you are happy with the result.  

Likewise, if your camera allows manual selection of the aperture, select the widest option.  Usually, this setting will be represented by a number preceded by “f/”, e.g. “f/2.8”, or “f/5.6”.  You want to choose the setting with the smallest number (i.e. between the above two, you’d go for “f/2.8”).

Finally, if you can also choose the exposure time yourself, then go for something like 30 seconds.

If your camera has a zoom lens, do not zoom-in, but use the widest setting.  Otherwise, star-trailing will be evident in your picture (unless your camera is mounted on a star tracker, as explained above).

Best of luck – and have fun!

Share this Post

Leave a Comment

Your email address will not be published. Required fields are marked *

You may use these HTML tags and attributes: <a href="" title=""> <abbr title=""> <acronym title=""> <b> <blockquote cite=""> <cite> <code> <del datetime=""> <em> <i> <q cite=""> <s> <strike> <strong>
*
*